home about making of videos faq contact
As you've probably realised by now, we eventually gave up on the sequins and wires. We spent ages working out how it was all going to come together; how the wires would be animated and raised up when the camera came past. We even briefly toyed with some mirrors and prisms in an effort to get the camera lens lower to the ground. We also considered building the entire set on a false floor that we could remove as the camera moved along, allowing us to get really low to the ground. This seemed like too much work, though, and would have really shook the set.

We also had to think about the final bit of this scene, where the last bullet flies into the camera.
As you can see in this 600k GIF animation from the film, the final bullet flies into the camera with the agent and building behind him all in shot.

This meant we couldn't mount anything off-screen or behind the agent without it being obvious. Bear in mind that our camera could not get as low as the one in the original movie, so our agent would be quite visible.
You can see here that we tried mounting the bullet on a wire that was occluded by the bullet itself. You can make out the shot in the LCD on the back of the camera there, and the wire cannot be seen at all.

This worked great, but turned out to be really hard to animate. Without being able to view the last frame we'd shot and the new one, we couldn't easily tell how smooth our animation was. After all, we had to move the mounting block for the wire along a weird path that kept the wire blocked from the camera's view as the bullet travelled.

Click on the image to the left to see the full size picture and the shot taken by the camera from the proper angle. Works quite well.
You might also note the mask we had on the back of the camera. This gave us a rough idea of where our cropping frame would be when we cut the frame down to match the movie aspect ratio. Handy for knowing when things were out of frame.
There's also a playing card in the shot there. We used this is a focus target for the camera. You see, a problem with these point and shoot cameras is that they like to think they know what you want to focus on. Quite often this is not what we wanted, so we needed something nice and clear to put into the frame to allow it to lock onto. This helped a lot.

Anyway, this "bullet mounted on a wire" business turned out to be too hard for us, so we had to come up with plan B. In the end, plan B turned out to be more of our arch-nemesis, the thin nylon thread. We hung the bullet from a pole on the gantry and animated it by simply sliding the pole along towards the camera. With only 9 frames or so in this part of the animation, we figured we'd put up with the aggravation that stuff seems to emit.

Around this time we also decided the sequins were not going to work. In a flash of inspiration we decided to do some tests using actual Lego for the trails. Our reasons to not try it in the first place were two-fold. Firstly we thought long Lego strands would not be able to hold their own weight, and would droop alarmingly. Secondly, we knew we'd need to buy loads of it in and thought the cost would be prohibitive.
It turns out that a huge bag of brand new clear parabolas and round singles and stuff costs very little. We're talking way less than $100 for more of this stuff than we needed. We did some testing and came up with a few different trail designs, but in the end we decided against using the largest parabolic dishes you can see here. They just didn't suit the scale of everything else in the scene.

We didn't use those big windows (Trevor just wanted to buy those for something else), but we used a couple of tiny ones as stands for when the trails got too long. It's possible to see one in our movie, but it goes by pretty quick.
We built a bunch of long trails of varying widths, as we decided we wanted to have our trails change size to match the movie more. The basic trail was a simple long chain of single clear round bricks. The next size up had those interspersed with the small parabolic dish block.

It was around this stage that we decided we could run our shoot forwards, rather than backwards as we had always planned. Tests showed the Lego trails were sturdy enough to allow us to add blocks on rather than have to take them off, and this made some things a little easier for us.

One of the problems, however, was how to make sure the shots were aimed correctly.

Imagine you are animating a shot from the agent's gun. Unless you get it pointed in the right direction from the start, you won't know your shot is off target until the trail is long enough to sight down. At this point you have to correct it, and that will look pretty weird in your finished movie as the whole trail changes angle.

Another problem was how to make the trail leave the gun. When it starts, the Lego is connected to the agent's gun, and will sit there quite happily until it gets so long it must be supported. But once the trail starts to leave the screen, you have to mount it on the other end somehow because it can't be connected to the gun any more.

As you'll see, we had various methods of solving these problems.
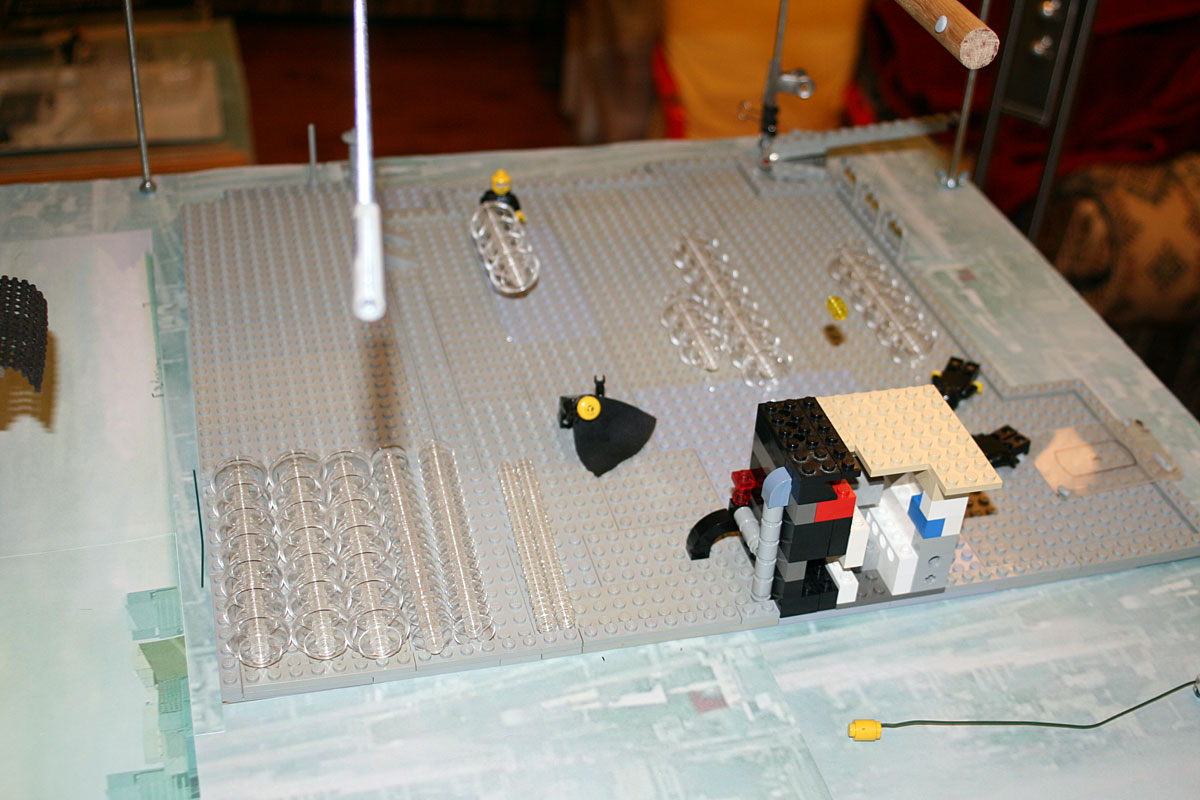
On the left here you can see some testing that was underway for both the Lego trails and the final bullet suspension. Whilst the thread the bullet is dangling from is just visible in this shot, I'm sure you can appreciate how much harder it is to see than in the previous scene we showed it off that had a pale background (see scene 10). At this time we were using a translucent yellow group of round single blocks for the bullet, but this soon changed to the solid yellow cylinder you see in the finished movie.

You can also see 3 different sized trails, and we ended up not using the biggest. You can see the agent with a bunch of them attached to his gun, and it looks like he's a Street Fighter character or something. Hadoken!
In this photo you can see a few points of interest. At the bottom you can see the main column of the OCR has a printout wrapped around it that shows the frame number, as well as the height. The cross-hairs line up with the pencil line there to give us the right height for the camera.

On the top of the set you can see a long paper tube with some clear Lego poking out of it. We used these tubes to align our trails, as well as to support them when we were removing them from the scene during the animation. We could also sight down them to ensure the trail was pointing in the right direction.
The Manfraudo Arc has also sprouted a few rubber bands, to make the tilt mechanism a bit more user friendly.

As a recap we now had our set worked out, how we would do the bullet trails, and how we would get the camera moving correctly. It was time to start shooting!